Showing posts with label tutorial. Show all posts

Saturday, January 3, 2015

Hot Cocoa Lili ...

Good morning! My name is Ruza a/k/a Ruza's Craft Corner, and today is my first post as a Inspirational Inkettes Designer.


Today's post features the adorable Hot Cocoa Lili. I have a little tutorial on how I went about creating the background and paper-piecing the image together.

First I printed off three (3) copies of Hot Cocoa Lili, colored Lili in full with my Copic Markers and fussy cut her out. Next I colored the pillow Lili is sitting on and added color along the edge of the image. I also colored the scrunchies in her hair for use later.


I applied a combination of Distress Inks along the bottom half of the image, with the colored pillow, and then cut some DP that was adhered above the pillow to represent wallpaper.


Next step was to paper-piece Lili using 3D Foam Squares and regular adhesive along the bottom, and then I fussy cut out the scrunchies and ran them thru my Xyron Sticker Maker before paper-piecing them onto the Lili.


Once everything was put together I layered the design on dark blue cardstock, and then onto my card. With a little manipulation, by lifting Lili's ponytail I added the sentiment bubble and sentiment.


I hope you enjoyed my tutorial, and you are inspired to try your hand at paper-piecing.

Wishing you a crafty weekend!

Thursday, January 30, 2014

"Box card 3-d" - "Tutorial"

Hello everybody! 

Valou here for the inspiration post today. 


We have quite our way of using our scraps. For my part, I have a box in which I preserve quite the scraps of white papers and a dress handkerchief in which I preserve all the scraps of printed papers.

I use these pieces of papers only for dies or punchers. Nothing else.

Now, here is a tutoriel to realize my card 3-d.

1. Draw in the white cartonnette, a square of 20 x 20 cms (8' x 8').

Draw in 1,25 cms (1/2 ') then in 2,5 cms (1') on each side with a plioir.


2. Draw a square in 5 cms (2') of the edge then an other one in 7,5 cms (3') of the edge also.


3. To cut corners as shows it the plan below.


4. Cut another piece of cartonnette of 12,7 cms and mark a line with the plioir in 1,25 cms 1/2 ') of the edge.

5. Cut edges to make flaps.  It's your "part 1".


6. Stick flaps to form a small box. It's your "part 2".


7. Cut a piece of cartonnette of 30 cms (12') x 15 cms (6'). Fold it in two equal parts. It's your "part 3".


8. Take back the " part 1 " and cut both squares of the center in diagonal.

Well mark all the folds.  


9. Stick flaps to end the base of your card.

10. Stick the " part 2 " in the center of the " part 1 ".


11. Finally, stick the " part 3 " behind your card.


Now, you do not have more than to dress your box - card according to your tastes.

I colorized at first my two images with ink " Distress ".


Then, I cut them with small scissors. I stuck my image "Scene" at the bottom of my card with some liquid glue.


 I took scraps, and I drilled with a puncher border. I realized it 4 and I stuck them around my center.


Then, I stuck of " Blue Bazzil cardstock " on the edges of my box. I realized the same thing with a slightly smaller printed paper.


I stuck foam pieces 3-d behind the girl to stick it on my box and give to her of the volume.


I used two other scraps of "Bazzil Blanc" and I drilled borders "Butterflies" with a dies " Joy! Craft ". I inked them with some ink "Distress Walnut Stain" and I added them between my previous two papers.


I stuck of the ribbon of given a pearly gloss pearls cream everything around the frame with of "Glossy Accents".


Then, with one scraps, me used a dies "Love" for the title.


For the decoration, I added a bow which I realized with a fall of ribbon " Blue Organza ". I then stuck various flowers. I covered them with "Glitter Stickels Icicle".


I got back a waste of my title, and I stuck it as an in the corner top-right embellishment of my box.


Have a lovely day! 

Kiss


Sunday, October 27, 2013

Merry Christmas Card Tutorial

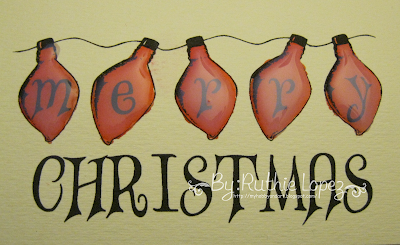
Hello crafting friends: today I, Ruthie bring you a quick tutorial of glass effect. I´m using the sentiment Merry Christmas String Lights Sentiment. I printed it on watercolor paper.

merry_lights_sentiment_ - Inky Impressions - Inspirational Blog - Ruthie Lopez DT - My Hobby = My Art

Then I colored it with distress ink, in this project I used barn door.

merry_lights_sentiment_ - Inky Impressions - Inspirational Blog - Ruthie Lopez DT - My Hobby = My Art

I put the distress ink on a plastic lid, then I take it from there.

merry_lights_sentiment_ - Inky Impressions - Inspirational Blog - Ruthie Lopez DT - My Hobby = My Art

Here is its how it looks with the distress ink Really bright, isn´t?

merry_lights_sentiment_ - Inky Impressions - Inspirational Blog - Ruthie Lopez DT - My Hobby = My Art

Then, you are going to apply the mod podge dimension al magic, but don´t shake it. Just let the liquid come out. It will flow slowly.

merry_lights_sentiment_ - Inky Impressions - Inspirational Blog - Ruthie Lopez DT - My Hobby = My Art

The final touch, its homemade glimmer mist. In this case I used green. And voila!!!! A quick and beautiful Christmas Card.

merry_lights_sentiment_ - Inky Impressions - Inspirational Blog - Ruthie Lopez DT - My Hobby = My Art

Hope you like it! See you next Sunday!

Ruthie

Wednesday, October 9, 2013

Mummy Card Tutorial


Hello!
Again here, I'm Cristina.
There are many versions of this mummy card, but if you have never done, I leave a small, fast and simple tutorial.


We need:
a piece of black cardstock 9 inches by 4 1/2
two pieces of cardstock orange 4 by 4 inches
12 strips of half-inch white paper for 4 1/2
two eyes 
two pieces of black cardstock, one-inch circle.
Disstres black and brown ink.
A die corner optional. Scissors and glue.
Inky Impressions digital stamp: Happy Halloween pennant.


 The orange cardstock pieces, rounding the edges.
After inking with black distress ink.

 I fold the piece of black cardstock in half.
Also rounding the edges.


 Stick inside black cardstock, one piece of orange.


 The strips of white paper.
I'm going to ink with brown sides, to give it an old dressing.

 When all the strips have inked, let's stick on orange cardstock that remains.
Strips placed horizontally, leaving a small triangle at the top, where you see the orange background.

Needless two strips of paper, put cross on the rest.

 When we all glued white strips. Turn the piece and cut what it excels.
Round the edges.

 Now stick it on the card.
Will the outside.

 I used two different sized moving eyes.
Stick to a piece of black paper (circle one inch).
You can leave and cut around the eye or smaller, as I have done.

Eyes stick the front of the card. Right in the orange piece before I left.

And finally this little mummy ornament with a banner.
I have used three times, two small and one larger, on a piece of orange cardstock.
Finally a bit of twine on the flags and is now complete.

Very simple to make your own lovely mummy Halloween card.

Be sure to visit our blog for more inspiration!